Hey all!
I have arrived safely, along with all my stuff (the cardboard boxes worked great and nothing was damaged). Akani, Lerato, and Britt met me at the airport and I got to meet the baby (she was sleeping), then we stopped at McDonalds, came home and Britt helped me unpack and Joy made us tea with rusks (how South African). =) I will take pictures and write a real post tomorrow!
Love,
Auntie Abbie

Thursday, May 28, 2015
Friday, May 22, 2015
Thrift store clothing refashioning
So I've been doing a lot of thrift shopping lately in preparation for going back to Africa! (Maybe a little too much shopping...it's so hard for me to say no when I can get something for $1!) I've always enjoyed thrift stores, but sometimes it can be hard to find things I like. It helped when we started going to some out-of-the-area ones. Mom and I like going up to Cleveland and down to Akron - some of the best stuff seems to be near the big cities.
Also, I've been doing a lot of alterations on thrift store clothing. Look up "thrift store clothing diy" on Pinterest and you'll see all kinds of cool ideas. Unfortunately, most of the people doing it are very thin women - it's easier to take a big something and make it small, than it is to take a small something and make it larger. There are limits. Most of my alterations so far have been limited to taking in the shoulders a little, or making the armholes larger, etc. I recently fixed a really cute brown pleated skirt that has been in my sewing basket for a LONG time....several years! I saw it at Salvation Army on the rack and thought it was adorable - but it *was* a size 20 wide, and although I'm not one of those thin girls on Pinterest, I am not a 20 wide (even after the rather unfortunate muffin incident in South Africa).
Anyway, I wanted to show you one of my refashioning projects!
I found this hanging on the wall at Goodwill. I liked it, but it was a size small, and WAY too low-cut for me. Plus, it had an elastic gathered waist, which screams "maternity top" on those of us who have had too many of the aforementioned muffin incidents.
The first thing I did was open the casing and pull the elastic out. I forgot to take a "before" shot, so this is kind of what it looked like all gathered up:
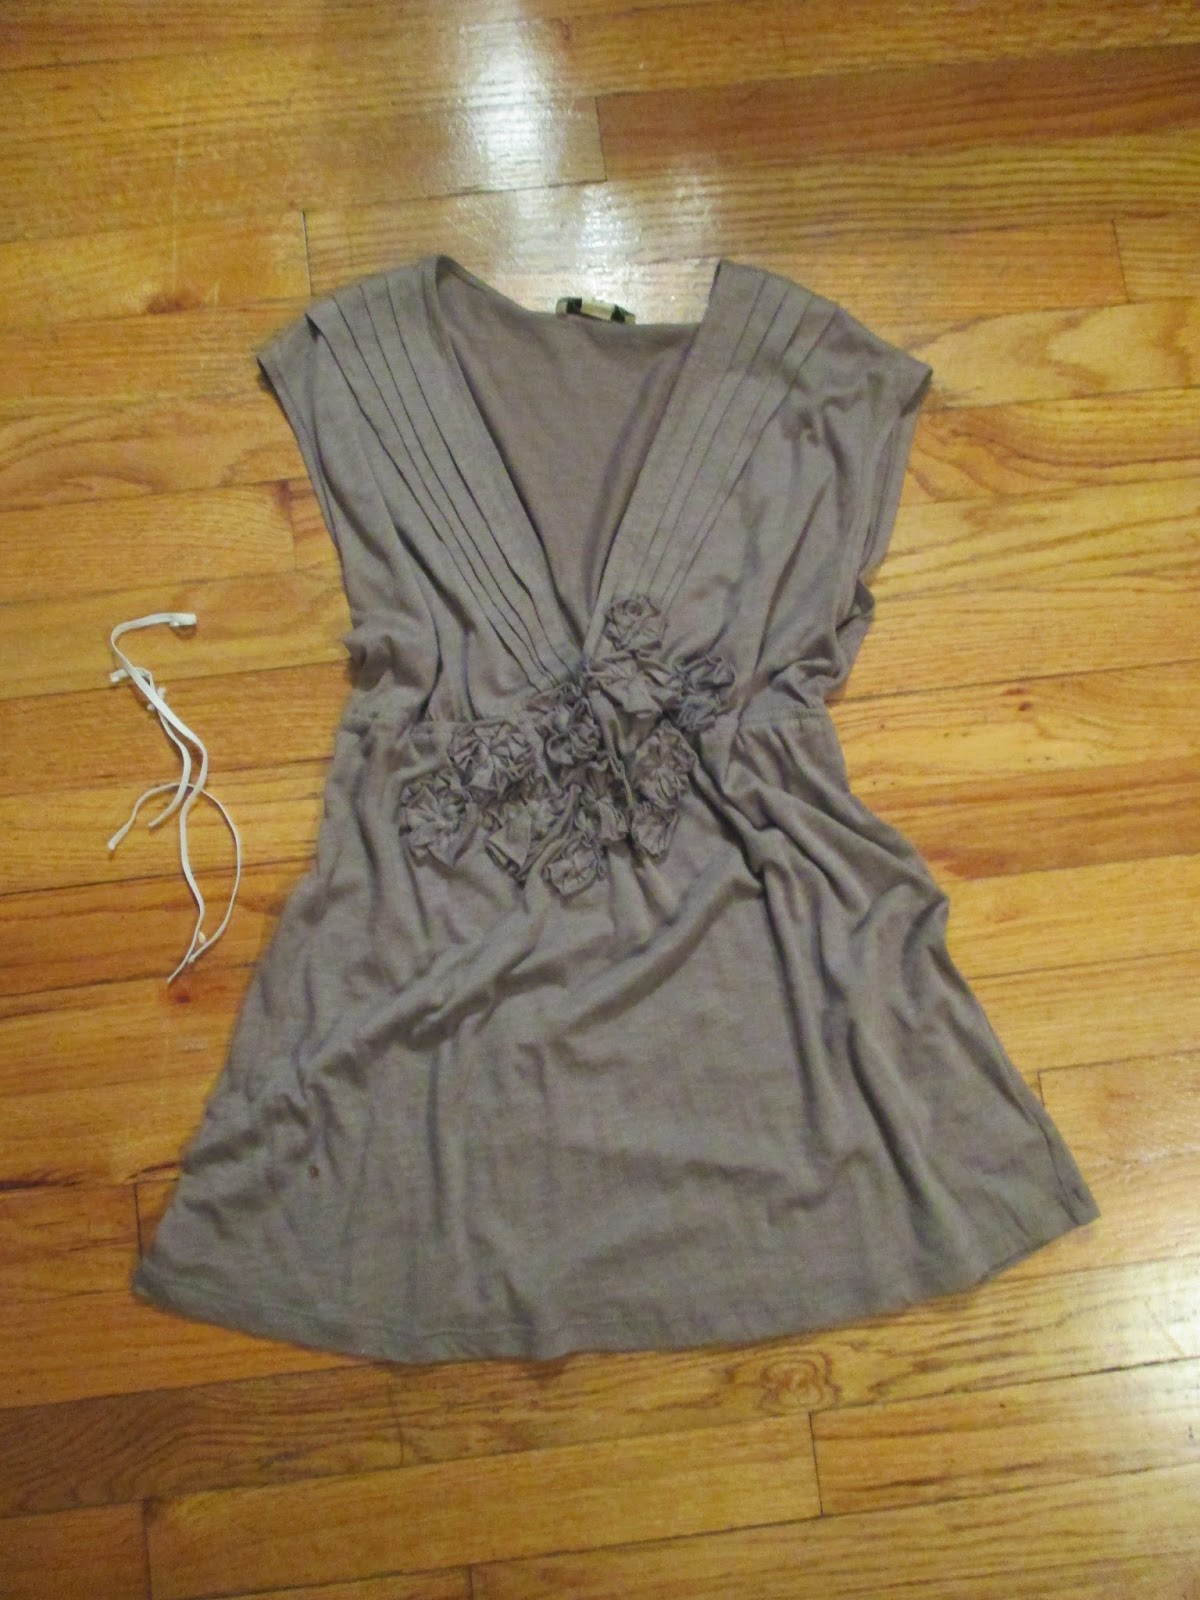
See, there actually was enough fabric to fit around me!

Earlier in Goodwill, I had grabbed several other items to help me out with this sewing project. This was one of them. Uh, after I cut the sleeve off. Again, I'm not so great at remembering to take "before" shots...

I kind of liked this top as is, and I almost went hunting for another lace top to destroy so I wouldn't have to cut up this one. But then I tried it on, and didn't like the lace sleeves AT ALL. They were kind of scratchy and weird and I'm not a big fan of see-through sleeves.
I cut both the sleeves off, leaving about 1/2"-1" of the sleeve on each armhole. I folded it under twice, then folded the whole seam under and stitched it to make a sort of casing for the armholes.

This was what I ended up with! I almost took the beads off, but decided to keep them.
Now back to the brown shirt.

I picked up a second shirt that almost matched. (Since it was just going to be destroyed anyway, I flipped through the shirts until I found one with the color tag of the week - $1.)
I cut out a section at the hem. Here it is with the sleeve from the lace shirt.

I pinned them both to the V-neck. It was harder than it looks to get it straight! Then I trimmed, leaving a generous seam allowance.

I pinned the right side of the lace to the wrong side of the t-shirt and sewed the long edges.

Then I flipped it right side out and pinned it to the V-neck of the shirt. I used two rows of blind hem stitching (by hand) to attach it, and blind stitching across the top to sew the triangle edge together.

This is what I ended up with! Usually with a shirt that is too low, I would layer, but with shirts that are REALLY low, I don't like the way they look...kind of like, "Hello! I am obviously and awkwardly trying to be modest!" I wanted it to look like it was part of the shirt.
I've finally started packing! A friend recommended these Home Depot moving boxes, a suggestion which is nothing short of brilliant. Sure, they will be awkward, bulky, and almost impossible to fit in my friend's car at the airport ;) ...but they are SO much lighter than a suitcase...they only weigh about 3 pounds each and the average suitcase weighs about 10, at least the ones they were selling at Wal-Mart. I'm taking 4 pieces of luggage, so that's 28 extra pounds...more than half of another suitcase! Good, I'll have room to take all these thrift store purchases...lol!

Not only are the boxes super light, they are also CHEAP! They only cost a few dollars each. Admittedly, a roll of shrink wrap (which I will use to secure them) cost about $20, but I think it is well worth it! They will be much easier to store in my room in South Africa than luggage would be, too. Just fold and slip under my bed...or, if I need furniture, I could just tape one or two shut and cover them with a pretty scarf to make a table of sorts. =)
Wednesday, May 20, 2015
Fundraising update
Well, due to some errors in calculation on my part, I'm actually a little bit under my adjusted-approximately-for-taxes goal. Update is on the side bar.
I will be on a plane to Africa a week from tonight!!! =)
I will be on a plane to Africa a week from tonight!!! =)
Monday, May 18, 2015
Almost time...
I can't believe I'm leaving in...well, I refuse to count down, but I'm leaving on the 27th. Do your own math! I'm too busy trying to accomplish everything necessary in a precious small amount of time. My mind is in a constant spiral trying to remember everything and I am definitely at a risk for schedule conflicts as I keep forgetting things I planned to do...despite my one-time attempt at using Google Calendar, which oh-so-conveniently emails me about ten minutes before I'm supposed to BE somewhere. Yes, I know I could change that, but it's one of the things I keep forgetting to do...
I have, however, done a significant number of things in the last month or so. I...
- bought plane tickets.
- got my visa.
- renewed my drivers' license.
- got my international driving permit.
- finished my quilt that I'm taking with me.
- visited my friend who I went to Bulgaria with last December.
- visited my friends from South Africa who live in Lancaster, PA.
- hosted my best friend for a week.
- did a massive amount of thrift shopping in preparation for the thrift store drought that lies ahead. ;) No, really, I did actually need clothes. Tank tops are kind of a necessity in hot South Africa...
- did my online shopping for the things I wanted to take back.
- did my online shopping for the things others wanted me to bring back. (For example, an automotive scanner and human hair...)
- learned to drive stick shift.
- shopped online for cars (although I'll have to wait until I go over to do any real shopping).
- finished up my journal orders.
- wrote a lot of craft tutorials for my blog that didn't have anything to do with the to-do list I needed to accomplish...
- cleaned my room for the first time in forever. Sort of organized it.
- judged for the homeschool group's Project Fair.
...among other things. It doesn't sound like much when I write it out but it's all the little things that take up the most time! More than the physical tasks, though, it's trying to spend time with all the people that I care about...it never feels like enough when I think that I will be leaving them for an indefinite period of time.
Please keep me in your prayers. Everyone assumes I must be out of my skin with excitement, but to be honest, I'm quite nervous. Yes, I know people this time, yes, I know I'm called to go, and yes, orphan care is my passion - but it's a major life change and I am rather anxious. This time, I know what it's like to miss people and be homesick, and I'm leaving for longer. I am also not an intern anymore, and that means a little more responsibility (aaahhh!).
Funds are coming together. This is a thank you/shout out to the anonymous person at church to donated $2000 - you may never be on the internet or read this, but you covered the rest of the potential, unexpected amount needed for taxes, and took a HUGE load off my mind! And of course, a huge thank you to everyone who has helped me raise funds to meet and exceed my goal. (I updated the thermometer on the side - finally! - by the way.) Many of you I know but many of you are anonymous. Someone asked my advice on fundraising. I told them the truth - I'm actually quite horrible at raising funds. God does it all and I don't know where probably a third of my money has come from, really. I look at our tiny church and scratch my head! They are deeply generous.
Sunday, May 10, 2015
Coptic Stitch Heart Binding

This is what I made! Here is another example, below, which is slightly neater. It's all in how large or small you draw your heart.

(Yes, that is a mini Tardis. No, I don't watch Dr. Who. =) It's for a friend!)
For the purpose of this tutorial, I will assume you already understand how to do the Coptic stitch. Pinterest has a lot of great tutorials!
Start off with a stack of prepared signatures, folded and trimmed to the size of your cover. Clamp them together firmly with binder clips. You might be able to see (faintly) that I made pencil marks where the two rows of stitching will be at either end. If not, look at the above pictures to get an idea where the end stitching should be.

Trace a heart in the center. The bottom signature has two dots - the point of the heart is made by attaching the cover. The top center point of the heart is made on the 3rd signature down. After marking everything, punch all the holes.

You will be sewing the heart from the top down. Punch two holes in the cover to match the two holes in the top signature.

Start on the left side - pull the needle and cord from the inside to the outside through the first hole. You will begin by attaching the first signature the cover.

I attach the cover by wrapping the cord twice around the cover hole. (This is on the 2nd hole.) The cord goes out:

Then thread it in through the hole and bring it up between the cover and the signature.

Pull it tight and thread it in through the hole and up through the crack again:

Now slip the needle behind the two strands and pull it through snugly. Wrap it around one more time to secure.

(That is my method of attaching all the covers on my journals. Again, for more details, there are a lot of great tutorials out there! Maybe someday I'll write one. ;) )
Skipping ahead to the second signature, this is how you make the top bumps on the heart. You can see that there are more holes on the second signature than on the first. Basic rule: every stitch must loop around a stitch below. You will be working from right to left on this signature. Out through the hole...

Loop around the stitch below and insert back into the same hole.

Bring your needle out through the 2nd hole and loop around the same stitch as the last.

When you finish both bumps, it will look something like this:

Continue on with the 3rd signature (left to right now).

Now you are to the top pointy part on the heart, and there isn't a lower stitch to loop around! What is there to do?

Easy - just loop around the cord in the inside of the signature.

Come out again through the center hole and loop around the next stitch on the signature below.

Continue on. It's pretty straightforward from here. The sides of the heart will slant - just make sure you don't pull the signatures out of alignment.

Now to attach the top cover. When you reach the middle, loop around the cover ONE time, then wrap the cord around your loop, as shown.

Insert the needle back in the same hole.

Bring your needle out through the other side of the heart. Loop through the cover hole once. Insert your needle under both loops and wrap the cord around two times. Insert needle back through the hole from which it came.

Finish attaching your cover. This should be your end result:
It's a little crooked, but be careful to trace your heart exactly how you want it and pull your stitches snug.
Happy bookbinding!
Tuesday, May 5, 2015
MBH April News
You can read the Muphamuzi Baby Home April newsletter here! Chubster went home with his new family - check it out!
Subscribe to:
Posts (Atom)