Hey all!
I'm excited to share with you a fun project I've been working on: upcycled journals.

I saw some ideas for upcycled book journals forever ago. Most of them involved keeping the original cover (which is neat and all, but as you see, I didn't end up doing that for most of them). I thought it was such a cool idea that I immediately began scouring Goodwill and such and buying ALL THE BOOKS EVERYWHERE! Never let it be said that Abbie Caple does anything small. I'm not sure how many journals I intended to make, or why I wanted to make so many. I'm not even sure why I picked the books I did - some have a decent amount of aesthetic value, but a fair amount of them are slightly ugly. Some I remember picking out for the illustrations, and I don't even know why, since I only needed to use the covers. I ended up with a large box of books that sat in the garage for...a really long time. I don't even know how long. At some point I took them out and started ripping covers off with abandon, so then I had a large box of very abused books that just sat in the garage.
Next time I get a new idea, don't stop me, but will someone please remind me to start small? I always want to do MASS PRODUCTION RIGHT AWAY and why I do this is a mystery to me.
Now that I'm home, I'm trying to pare down my collection of stuff just a bit before I leave the house for an indefinite period of time. So I thought, "How about finally making those journals?" I started dreaming up all kinds of ideas. I read internet tutorials. And I went out and bought more STUFF. Cardstock, many kinds of glue, etc. So much for paring down. I'm pretty sure I now own more stuff and not less.
I attempted one journal.
I'm still in love with the design, but it was a sloppy, wrinkled, gluey mess. The Modge Podge-ing was all wrong. It was my first attempt at any kind of bookbinding, and I followed a tutorial on glue binding (attaching the pages with glue). They kept falling out. Not to mention the back cover looked like this:
Ugh, spray glue! Apparently you have to use it very sparingly on anything but the thickest of paper (like, cardstock). Or else it dries like that. Of course, if you spray a thin coat it doesn't stick very well. I use it a little bit, but I haven't found it handy for much of anything journal-related.
I put everything in a box and ignored it for a month or so while I crocheted things. That, I can do.
Crochet orders began to wane, and I decided it was time to dig everything out of the box and try again. After my brief foray into glue binding, I decided I wasn't ever going to try that again. I needed to learn Coptic binding, which surprisingly isn't as hard as it sounds.
So without further ado, the tutorial. I made a number of journals this week, and the photos are not of any one journal all the way through. Also note: I'm not even on the level of hobbyist bookbinder. I probably did a lot of very random, weird things compared to someone who is not an amateur. At some point, I think I was even making up my own bookbinding techniques...but it ended up working out, at least for a nice DIY type project.
It took a lot of experimenting, frustration, ripping apart, and redoing to come up with an acceptable finished project. I did practically everything wrong before I did it right. I'll share what I've learned so hopefully someone else doesn't have as many flops!
Pages
Start with your paper, I used plain white copy paper. I would have liked to use cream, but it was very difficult to find. I asked for "off-white" and the Office Max guy showed me gray, an ugly peach-ish color, and $40/package resume paper. I suppose you could order it online somewhere. But copy paper is cheap.
Depending on the size of the cover you intend to use, you may have to cut it to size. I made a variety of sizes of journal, but my favorites were ones made from Dr. Seuss readers and Little Golden Books. For the Dr. Seuss books, you simply have to fold an 8 1/2 x 11 sheet in half and trim the side - no cutting. Little Golden books, if I remember correctly, use exactly half of a sheet of paper, folded in half.
I then stacked the folded pieces of paper in "signatures," which is the fancy name for those booklets of paper in the pictures above. I did eight pieces of paper in a signature, and six signatures in a journal for 96 pages. (It makes 96 when they are folded in half.)
For all page trimming and cutting, I would recommend one of those big heavy-duty paper cutters with the arm that swings down. I folded everything, then took all my papers to our church and trimmed and cut them. I tried using our little paper cutter, but it could only cut through a few sheets at a time and they did not match each other at all despite my best efforts. The big cutter works better, but it was still a little hard to trim through 16 pages. In a little bit, I'll show you a neat "cheater" trick I found to make the edges of your journal look nice!
When you stack 8 pages inside each other, the inside sheets naturally stick out farther than the outside ones. So, you will have to trim them, unless you don't care. This is why I couldn't unfold the signatures and cut through 8 pages at a time - they wouldn't be arranged the same way as when they were folded, and it wouldn't cut where I wanted it to. I had some success with brute force, and flipping the signature around and cutting from the other side when the paper cutter didn't want to cut any farther.
I carefully made five small marks in the crease of each signature - one in the middle and two at each end. Measure - you want them to line up exactly.
I used an ice pick to punch holes. You don't want large holes - just big enough for a needle to slip through. I followed a tip I found online and laid the crease of the signature in the crease of an open phone book. It worked very well. (We now have a phone book with random stab marks.)
You will need a needle and thick thread. This is what I used (doubled over). It's from my grandma's stash. Any thick thread would probably do. I bet you could even use dental floss.
I used the instructions for Coptic binding found
here to sew my pages together. (Scroll down to part VII for the instructions on sewing.) I'm not sure if you could say my journals are truly Coptic bound books, as I just used the technique to sew the pages together and did not use it to attach the cover. Nevertheless, it was very helpful.
The instructions may look intimidating and confusing, but if you read them slowly and just carefully follow the directions one step at a time, it's actually quite easy.
I think "real" bookbinders (not amateurs like myself) might use some kind of a frame to keep the pages carefully aligned. I don't have one of those, so I just tried to hold them together very neatly while I sewed.
This was my first one. It was kind of messy. If yours is too, don't worry - it won't show.
I forgot to get a good close up, but these ones look better. You learn as you go!
Now you have this beautiful book block (I think that's what it's called??) but THE EDGES DON'T MATCH UP!! AAAAHHHH!!! I read all kinds of articles online. They suggested any number of things.
- A chisel. I'm still not sure how this idea was supposed to work. It sounded very complicated and...intense.
- Hand-tearing. Each individual page. On something called a tear bar that I don't have.
- Taking it somewhere to get it cut. The whole idea of this project was for it to be affordable, so no.
- Cutting each page. One by one. With a butter knife. Ain't nobody got time for that...
If you're like me and want things to be very nice (read: a perfectionist) don't worry, there is hope. I underwent a great deal of frustration before I discovered a simple hack: sandpaper.
Get a piece of CLEAN sandpaper and find some way to clamp your pages. I used encyclopedias. This old library set from 1990 comes in handy all the time...even though I haven't read them for years! ;)
My brother, lover of knowledge and facts, freaked out a little when he walked by and saw the encyclopedias sitting on our dining room/craft table. He'd seen me recklessly destroying books all week and thought the encyclopedias might be destined for the same fate. "You can't get rid of those! They were my first grade reader!" (True story. Well, I don't remember in what grade he learned to read, but he went more or less straight from "The cat sat on the mat" to the encyclopedia. I think he might have even skipped "The cat sat on the mat.")
Sand, sand, sand. This will make a lot of dust. No, I should not have done it in the dining room. Yes, I kind of did. At least for the first round. You should probably not do it anywhere nice, at least if you have an opposition to everything being covered in a fine white film.
If you're looking for a perfect, store-bought book edge, you'll probably still be disappointed. But this leaves a very pretty, soft, forgiving edge (especially if you've been very careful with your cutting and sewing). It's probably similar to the butter-knife effect, but a whole lot easier.
You're now pretty much done with your book block! (I'm just going to call it that. I Googled it, but still didn't turn up much info on whether it is correct. I seem to remember reading it somewhere, and it sounds right...)
It's time for me to introduce you to your adhesives of choice.
From left to right -
Elmer's Craft Bond Spray Glue. Note the warning earlier in this blog post - it isn't good for a whole lot, but it has its uses.
Elmer's Craft Bond Quick Dry Glue. This stuff is magic. Buy a lot of it. It dries super-fast and has a very strong hold. I'm not sure I'm ever going to want to go back to school glue...
Elmer's Craft Bond Fabric & Paper Glue. This takes a long time to set, and dries with what the bottle calls a "wet tack." It feels rubbery and weird. I don't use it for much - just coating the spine. It's nice and flexible and works well for that purpose.
Modge Podge. You will use a lot of this. (At least I did when I made twelve journals. Lol.)
It's now time to coat the spine with the fabric & paper glue.
You can now set it aside to dry. It doesn't have to be perfectly dry (according to the bottle, that takes 24 hours) but it should be sort of dry to the touch or else it'll be messy. Now is a good time to work on the cover.
Journal cover
This is where you get to be really creative with your journal design. I used a number of ideas - maps, aged sheet music, pages from a vintage children's storybook, or just the original book cover (as with the Little Women journal). I used vintage clip art and some different images I found on Pinterest, etc. Have fun! But I'll show you how to make the styles of cover I used.
I used a packing tape transfer for most of my first journals.
Here are the instructions on how to do that.
Depending on your image, it might be easiest to just print directly on the paper you are going to use.
I cut the sheet music to standard paper size, played around with our printer until I found the right direction to load it, then printed this birdcage graphic onto it.
For these smaller sheets, I used double-sided tape to stick them onto a standard sized piece of paper. There is probably some way to set your printer to a smaller page size, but I couldn't figure it out and this was easy. To get the image exactly where I wanted it on the page, I printed on a regular piece of paper first, then carefully aligned the storybook page over the image and printed it again exactly the same way. I used Paint to resize my images and place them exactly where I wanted on the print setup.
Printing directly onto the paper is easiest, but some images still show up better with a packing tape overlay, so it's good to have several different techniques down. =)
Here I'll show you how I made the cover for one of the smaller journals. I started with a slightly scribbled-in Little Golden Book. First you will need to remove the cover - either cut it, or carefully rip. It should come off easily.
They were a little too wide, so I had to cut them to size. (This was before I trimmed the paper height and made the book block for this particular journal.) I traced it and cut with scissors. You want it to be fairly straight, even though it will be covered up.
Now center the cover over your design.
Trace a margin on three sides (you don't really need to have one for the spine edge).
Now for the Modge Podge! I tried many, many different variations on decoupage throughout this project. Most of them didn't work very well. I haven't had too much of a problem with other projects, but it seems to be harder to decoupage something that has to wrap around something else. This is the best technique I've found.
Get a spray bottle full of water and lightly mist one side of your paper. Watch it curl up. Spray the other side. It will relax. I think the paper is shrinking. Or the fibers are relaxing. Or something. Whatever the case, you wouldn't think wetter is better, but it's true.
Paint the book cover with a light coat of Modge Podge. Now paint the back of your paper. Remember: wetter is better. I kept my paintbrush soaking in a cup of water (I had to wash out way too many dried paintbrushes) and it thinned the Modge Podge down slightly and seemed to do the trick.
Now stick them together.
Sorry, it's a bit blurry.
Now it's time to glue down your pages. Remember, your paper is wet, so handle it very carefully. Snip the corners like this:
Spread a thin line of glue around the edges...
...and glue it down neatly. Use the quick drying glue and press it down for a few seconds to secure the edge. (Throughout the project, when using the quick drying glue, you must press/hold/smooth it for a moment until it sets a little. Then when it sets, it really sets! It's wonderful. Until you mess something else up and are trying to take your project apart without ruining it.)
Let it dry a little (not completely), then Modge Podge the top. If you're using a packing tape transfer, follow the instructions from my tutorial (link above).
I enjoyed embellishing the covers with rhinestones, as well. It adds a bit of bling.
After it dries (use as many coats as you like) it's time to attach the spine! I didn't measure, but it needs to be a little taller than your journal and the width will depend on the number of pages you use. It should be about...this wide. ;) I used a thick black cardstock from the scrapbooking section at Walmart, but a thinner cardstock would probably be best - less stiff - if you can find it.
Spread a thin line of glue down the edge of your covers.
Carefully center the spine on your covers. If you're using music or book pages, it's really easy for it to look very crooked! Give it a few moments, then flip it over.
I flipped the book covers for this journal inside out because I was afraid the color would show through the sheet music.
Glue your ends down securly.
After it dries, you can coat the spine in Modge Podge and let that dry. You will probably want to use several coats.
Yay, cover!
*Edit*
I wasn't entirely happy with the cardstock spine. It looks nice, but repeated wear leaves creases I didn't particularly care for. They're not too bad, so I'm just going with it being an aged/vintage look! I don't think they would show up so much on a different color, but black shows everything and I'm not sure how well they would hold up with intense use. They're functional, but next time I think I will cover the cardstock in a thin black fabric (maybe one with a linen type texture) and then glue it on the cover. If it's too stiff, I might even glue fabric over paper that is thinner than cardstock - the fabric should help reinforce it - and then still use Modge Podge. I'd recommend trying it this way.
Putting it together
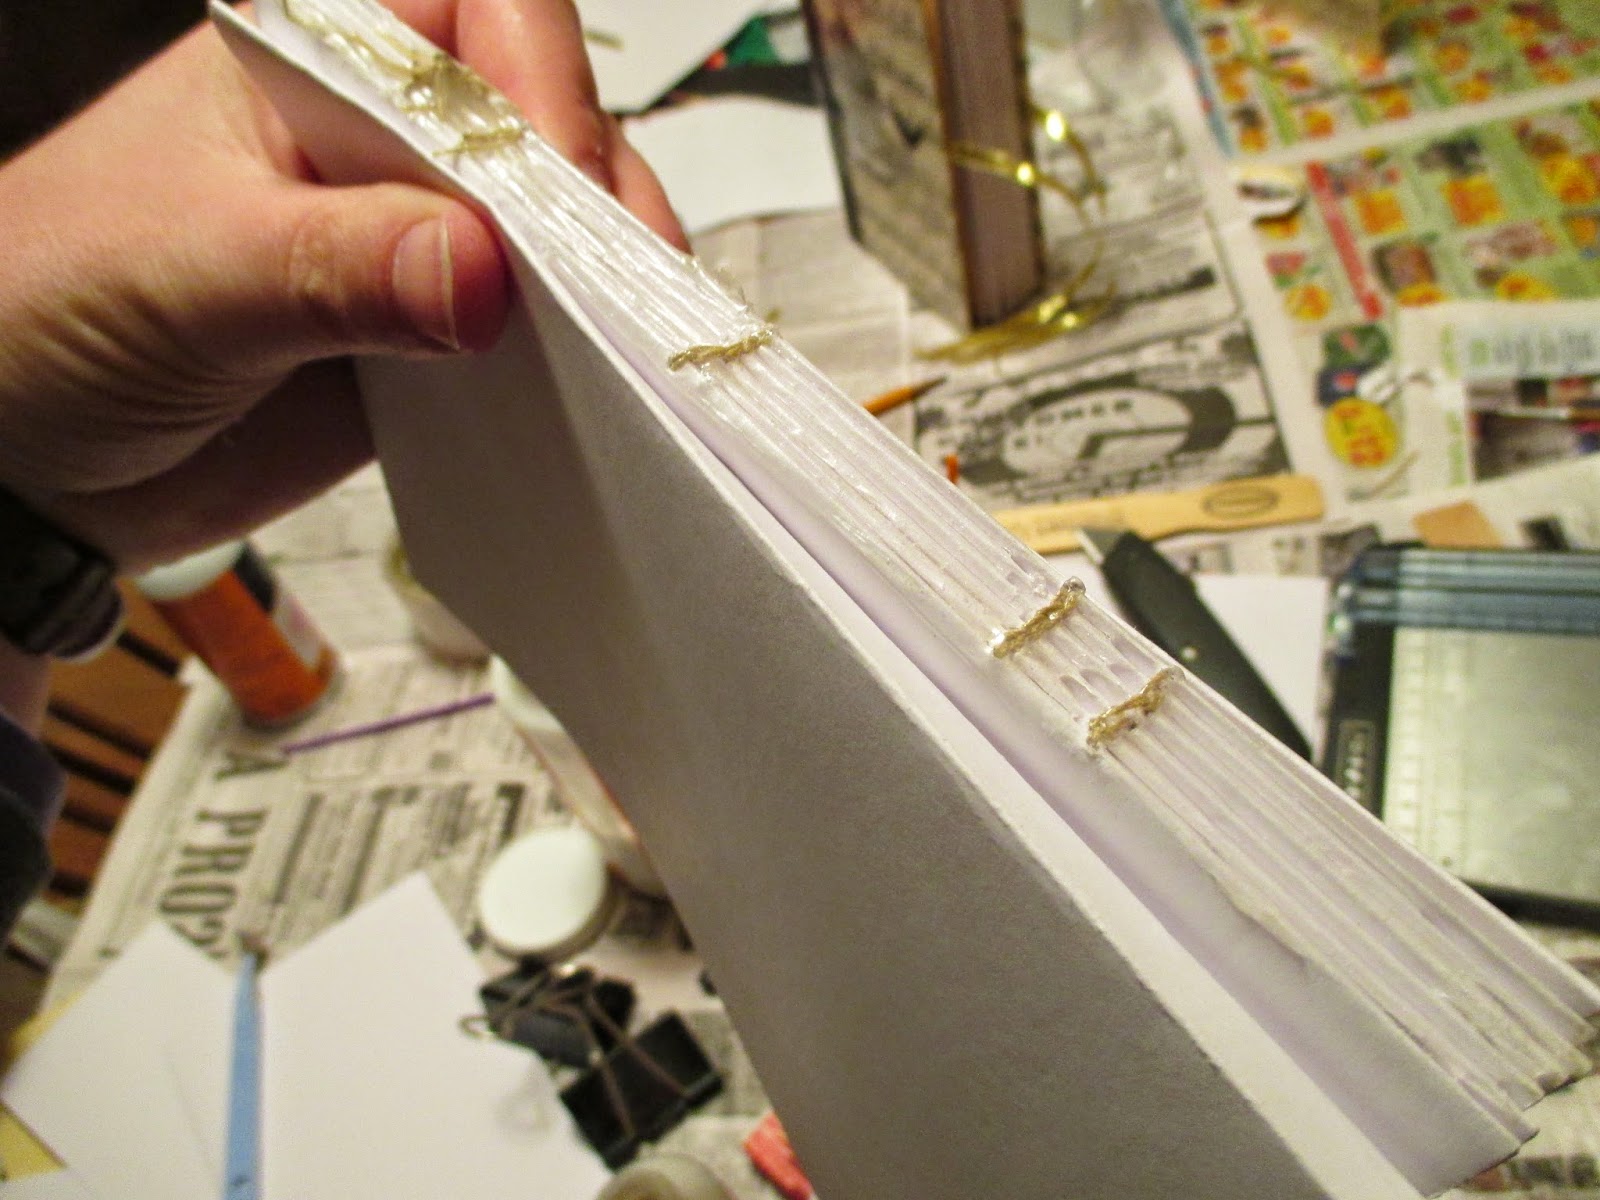
Now it's time to prep the inside for attaching to the outside. I tried a few different ways to do this. The first attempt didn't allow the journal to open fully unless the pages were perfectly sized and snug against the spine - and most of mine had a little gap between the book spine and the cover spine. So I studied a couple of my store-bought journals and came up with this technique that allows them to open fully.
Do you see what I mean by a gap? In this journal I've made little accordion folds in the binding that help. I'll show you how. First though, I cut a piece of cardstock the length of the spine to a width big enough to wrap around the edges - see below. I glued it down, using binder clips to clamp it for 10 minutes or so while it dried.
I then bent the outside pages back and forth and creased them well - you want it to be flexible.
This is the step I forgot to take a picture of. Take a piece of cardstock exactly the size of your book pages (before you folded them over). Fold it in half. Now make a second crease about 1/4-1/2" from the first crease. So you will have a long side, two creases, and a short side.
Glue the short side to the first page. Spread the glue VERY evenly with a paintbrush, but leave a thicker line next to the crease - this part gets a lot of wear and tear and needs to be reinforced.
Match the edge of the cardstock to the edge of the page and glue it down. There should be a little gap between the crease and the book spine - don't glue it down all the way! Fold it on the off-center crease so the unglued side of the cardstock extends beyond the pages - this way it won't get glued by accident while it dries. Repeat for the other side. Clamp it for a little while. You want it to be very secure.
It will look like this:
After it dries, fold the crease back where it belongs. (This is an "earlier model," before I started gluing the extra piece around the spine.) It's kind of an accordion pleat.
At this stage, I again forgot to take detailed photos....but you will now be attaching the inside to the outside. First, if you want a ribbon tie, cut it to fit and glue it on the inside of the cover. (You can seal the ends, so they don't fray, by very carefully waving them over a candle flame.) Spread the glue onto the long side of the cardstock with a paintbrush, but put extra on the back edge and around the back corners by the spine. Coat it up to the middle crease. Line the cardstock up with the edge of the book cover and glue it down. Coat the other piece of cardstock with glue, then carefully bend the cover around, line it up, and glue it down. It'll be a little springy and keep trying to come loose, so pile an encyclopedia or two on top for a while.
If your inside edges are messy, you can cover them with washi tape. Washi tape was a whole new revelation for me. I'd heard of it before, but I didn't realize how...sparkly and wonderful it is.
I think it makes the edges look pretty snazzy. It's also nice for lining the crease if you happen to rip it or something.
Ta-da! The book now opens quite easily. Because of the way the pleats lay, when you go to close it, you may have to tug the page edges a bit to close it or it won't shut (think of a three-ring binder and how you have to adjust them to get them to shut sometimes), so the design isn't perfect - probably because the cardstock spine isn't terribly flexible. I'm sure there's a better spine material out there somewhere. But I think overall it works pretty well!
You may have to trim the cardstock edges (around the first page). If the glue job looks a little wrinkly, I use a light coating of spray glue and glue the second page to the first - it kind of covers it up.
Here are some pictures of the finished products!
This one I fixed and fixed and fixed until the birdcage accidentally became off-center. So I painted on some music notes, and I think I even like it better now.
This one was made from an old Nancy Drew or Hardy Boys book that still had the spine attached, so I just covered the whole thing in a map. I don't think I had to use accordion pleats on this one.
I love this cover! This was the first one I made, and something with how it was sized just made it very easy and deceived me about how hard the rest would be! I didn't feel too bad about tearing up this book to make a journal - I really dislike the abridging of books. ;)
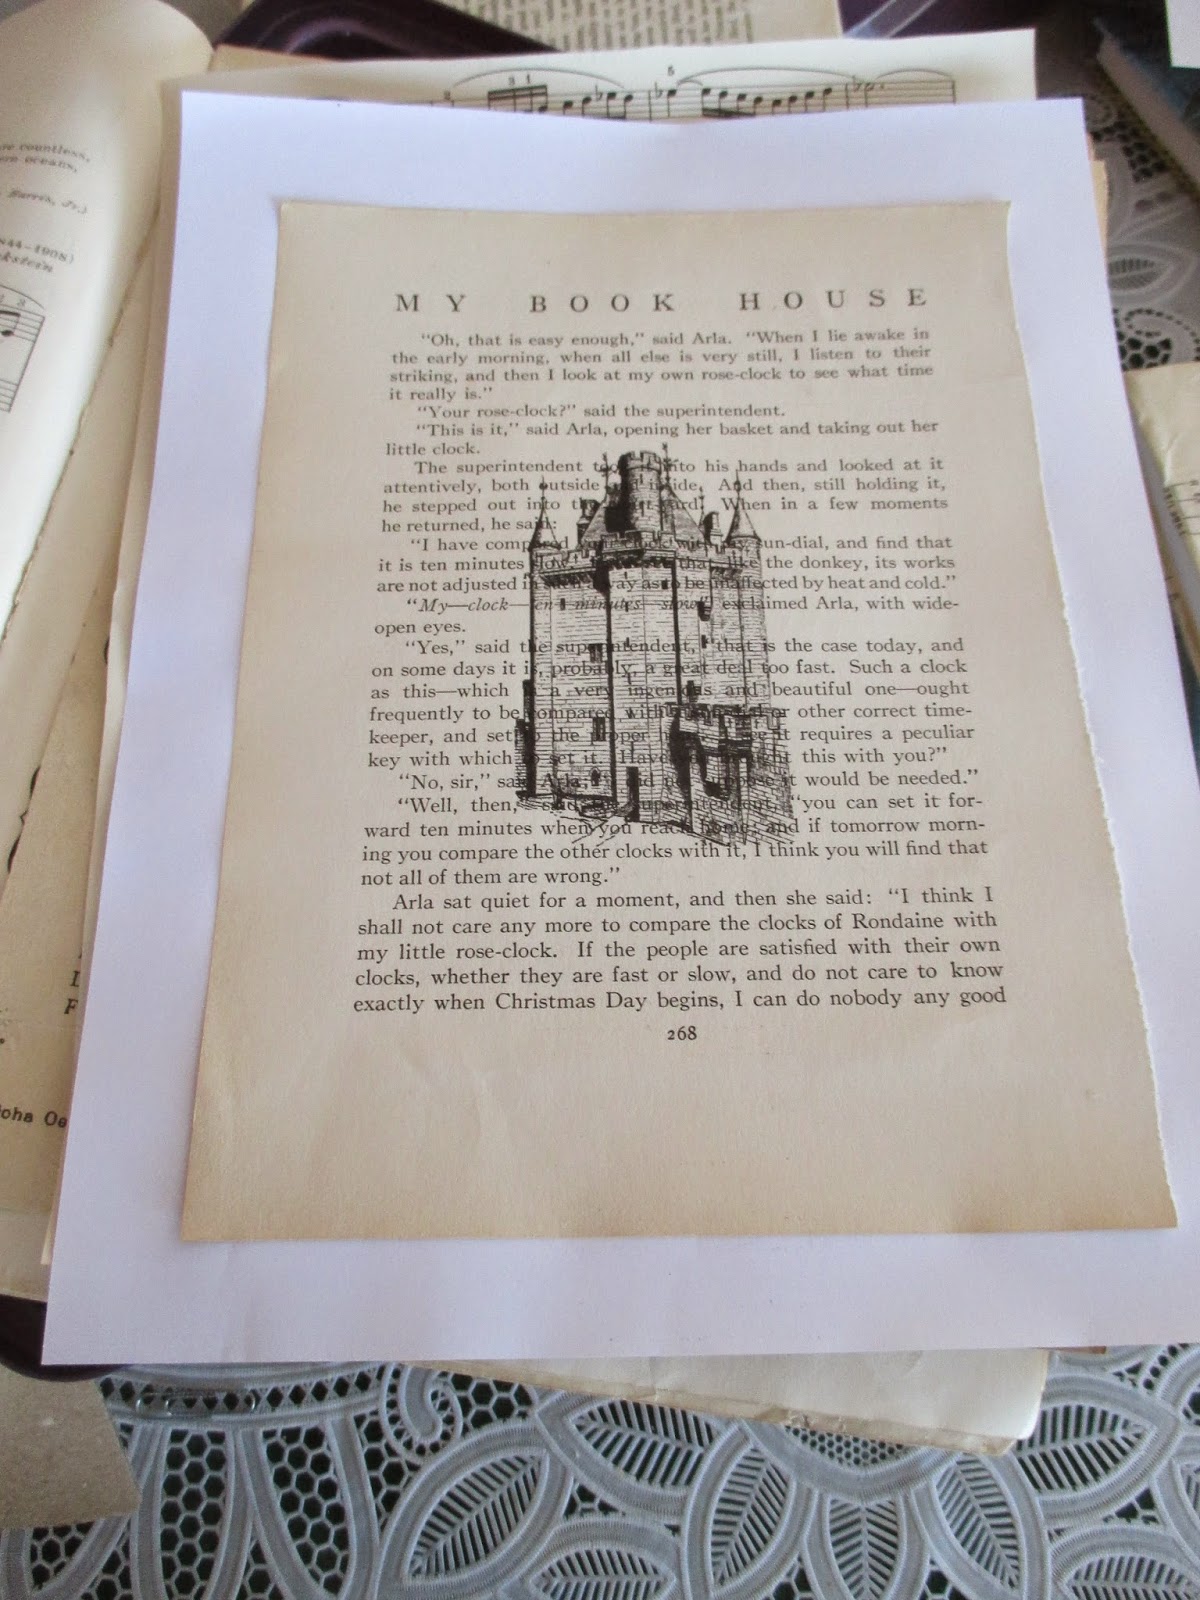
Castle journal - this is one of the ones I accented with rhinestones.
Key journal
Pocketwatch journal
Ship journal
Mini journals - fairy mushroom house over storybook text, bird and cage, grand piano
I hope you found this tutorial helpful (if you would like to make your own journal) or at least informative (if you're just curious and bored enough to read all the way through)! I still have a few more to finish up as well - you can see them in the first photo in this blog post but they are not done yet.