Showing posts with label Patterns. Show all posts

Friday, March 27, 2015

Bitty Bow Pattern

I have a lot of scraps of yarn. I like to think of it affectionately as my collection of strings-too-short-to-be-saved (although I still end up saving them). With an Easter craft show coming up this Saturday, I thought I'd put them to good use and make some hair clips.


Oops, I think I went a little overboard.


This is my standard go-to bow pattern, and I made a lot of those, but I ended up with even shorter scraps of yarn left over that were still too long to throw away. The bows I made from the pattern were fine, but I wanted something smaller.


Here is a very simple pattern for a smaller bow:

Ch - chain
Sc - single crochet
Sl st - slip stitch

Row 1 - Ch 9, sc 8
Rows 2-4 - Ch 1, sc across

Sc around outside edge of bow, working 3 sc in each corner. Sl st to close. Fasten off and weave in ends. Wrap yarn around the center of your rectangle until you are satisfied with the size of your middle. Fasten off. Either leave a long tail for sewing or weave in your end.

You can now attach your bow to a hair clip, or sew it onto a hat or anything that needs a bow.


Bunch of Bitty Bows


Larger bows

I love all these colors. The problem is, I can't replicate these as I'm using scraps from all the random colors I've almost used up.


Still love pink and purple just as much as I did when I was little!


Baby Ballet Slipper Pattern

I got an Etsy order for some ballet slippers last week, so I wrote down the pattern as I went. It's similar to various other patterns around the web, but I've tweaked it a little for size and the type of yarn I use, and added the criss-crossing ribbon in front. I originally designed them for my cousin's baby - she wanted something that tied.


Ch - chain
Sc - single crochet
Dc - double crochet
Hdc - half double crochet
Sc2tog - single crochet 2 together
Hdc2tog - half double crochet 2 together
Dc2tog - double crochet 2 together
St - stitch
Sl st - slip stitch

Hook size: H (5mm)

I used a 4.00 mm (G) hook and 2 strands of thin baby yarn held together. This pattern makes approximately a 3.5" sole - an 0-3 month size. If you are using worsted weight yarn, you might have to use a larger hook to get the same measurements.

Round 1 - Ch 10, sc in 1st st and next 7 sts. 5 sc in last st, 7 st up other side of chain, 2 sc in last st, sl st to close.

Round 2 - Ch 1 , hdc in st and next 7 st, hdc 2 in st (6x), hdc in next 8, sl st to first st

Round 3 - Sc in back loops around, sl st to close

Round 4 - Ch 1, hdc around, sl st to close

Round 5 - Ch1, 9 sc, hdc2tog, dc2tog (3x), hdc2tog, 9 sc, sl st to close.

Round 6 - Sc 7, sc2tog, hdc2tog, hdc, hdc2tog, sc2tog, sc to beginning of round and join with sl st. Break off yarn.

Heel flap - Join yarn 3 sts to the right of where you broke off your yarn. Ch 2, 6 dc across back of slipper, fasten and break off yarn.

Weave in ends.

Weave ribbon through the edge of slipper. It takes quite a long piece of ribbon (I didn't measure).


I just used it straight off the spool and didn't cut it until I was finished. Start weaving it in and out around the center front hdc, then work towards the heel. Ribbon will overlap across heel flap.


And there you have them - accessories for your little ballerina's feet! =)

Saturday, March 21, 2015

Tiny Baby and Carrier Set Pattern

So I've spent some time recently making two of these little baby doll/blanket/carrier sets, and I thought someone might like the pattern.


To give credit where credit is due, there is at least a partial pattern on this site.  Unfortunately, the original language is Danish, and crochet patterns don't translate very well. I think she only has a pattern for the carrier. I tried to follow it as well as I could, but with Google Translate phrases such as "crochet 20 air masks" and "symmetry in hank wagons" I just kind of gave up and made my own pattern. Hopefully no one minds!


The carriers are lined with felt, and the dolls and blankets are removable.

Ch - chain
Sc - single crochet
Dc - double crochet
Hdc - half double crochet
Sc2tog - single crochet two stitches together
St - stitch
Rnd - round
Rep - repeat

Yarn weight - worsted
Hook - E (3.50 mm)

You can join your rounds, or work in a spiral without joining - your choice.

Blanket

Ch 16

Row 1 - Hdc in 1st ch from hook, 14 hdc (15 st), ch 1
Row 2 - Ch 2, Dc in 2nd ch from hook and next 14 sts.
Rows 3-6 - Repeat rows 1 & 2.
Fasten off.

Baby

Head

Rnd 1 - 5 sc in magic loop
Rnd 2 - 2 sc in each sc (10)
Rnd 3 - 2 sc in 1st st, 4 sc, rep around (12)
Rnd 4-5 - Sc around
Rnd 6 - Sc2tog, 4 sc, rep around (10)

Stuff with fiberfill

Rnd 7 - Sc2tog around (5)

Finish stuffing and sew shut.

Body

Rnd 1 - In desired color, pick up 6 sc around where you finished off on the head.
Rnd 2 - 2 sc in first, 1 sc around (9)
Rnd 3 - 2 sc in first, 4 sc, 2 sc in next, 3 sc (11)
Rnd 4-11 - Sc around, changing colors if you would like to make stripes.
Rnd 12 - Sc2tog, 4 sc, sc2tog, 3 sc (9)

Stuff and sew shut.

Arms (2)

Rnd 1 - 4 sc in magic loop
Rnd 2 - 4 sc
Rnd 3 - 5 sc (Increase however you like - I join my rounds so I just make an extra stitch in the last (slip) stitch before joining.)
Rnd 4-5 - 5 sc

Stuff 

Rnd 6 - Sc 2tog, 3 sc. Fasten off and leave tail for sewing to body. 

Hat 

Rnd 1 - 6 sc in magic loop
Rnd 2 - 2 sc in each st around (12 sc)
Rnd 3 - 2 sc in 1st st, 5 sc, rep around
Rnd 4-6 - Sc around.

Sew hat to head and arms to body.

Carrier

Rnd 1 - Ch 15, dc in 2nd st from hook and next 11, 6 dc in next, dc in next 12, 4 dc in last. Sl st to first st.
Rnd 2 - Ch 1, 2 hdc in next, 12 dc, 2 hdc in next st, 2 sc in next 2 st, 2 hdc in each of next 2 sts, 14 dc,, 2 hdc in next, 2 sc in each of next 2 sts, sl st to first st.
Rnd 3 - Ch 1, sc around in back loops.
Rnd 4-6 - Sc around
Rnd 7 - 7 sc, ch 6, skip 3 sts, sc 18, ch 6, skip 3 sts, sc 11, sl st to first st, ch 1
Rnd 8 - Sc2tog, 5 sc, 10 sc over handle loop, 6 sc, sc2tog 3 times, 6 sc, 10 sc over handle loop, 7 sc, sc2tog 2 times. Sl st to first st and fasten off.

Cut out felt in a coordinating color and hot glue it to the inside bottom of the carrier (easiest if you flip it inside out to do so). I suppose you could sew it instead, if you like.


Tuck your tiny babies inside their carriers with their blankets, and enjoy!


Wednesday, January 1, 2014

Snowflake pattern (Applique)

I've decided to start posting some of the patterns I use to make my hats and various other items that I make. I hope all of you crocheters who are interested will be patient with me - although I design TONS of my own patterns, from pictures or from severely adapting other patterns =) I've never written any of them down, generally going more by feel than by any concrete set of instructions.

This pattern is for the snowflake applique. It was originally a pattern that I found on a website somewhere, but I memorized it, did it a bunch of times, and it gradually morphed into something rather different, and easier to sew onto my hats.

Snowflake Hat Applique

Ch - chain
Sc - single crochet
Dc - double crochet
St - stitch
Sl st - slip stitch
Rnd - round
Rep - repeat

Picot stitch (used for snowflake tips) - Ch 5, sl st in base of ch 5, ch 6, sl st in base of ch 6, ch 5, sl st in base of ch 5. Sl st in base of first ch 5.

*For those of you who don't like scrolling through tons of pictures, I've included a copy of just the pattern at the bottom.

Rnd 1 - Sc 11 stitches in a magic ring. Magic rings are wonderful things, and leave smaller holes in the center of your crochet project as they allow you to pull the hole tightly closed.


Tighten the magic ring and close with sl st to first sc.


Rnd 2 - Ch 2, dc in next st, ch 3, *dc in next 2 sts, ch 3, rep from * around.


This should produce 6 loops. Sl st to ch 2 at beginning of rnd.


Rnd 3 - Sc in first ch 2, dc space.


3 sc over ch 3


Picot: ch 5


Sl st in base of ch 5


Ch 6, sl st in base of ch 6


Ch 5


Sl st in base of ch 5


Sl st in base of 1st ch 5


3 sc in other side of ch 3. Sc in space between next 2 dc.


Repeat for each arm/branch of snowflake. Sl st to 1st sc, and fasten off, leaving a long tail for sewing. Weave in center end.


Attach to anything you desire to make a little more snowy!


Rnd 1 - Sc 11 stitches in a magic ringTighten the magic ring and close with sl st to first sc.
Rnd 2 - Ch 2, dc in next st, ch 3, *dc in next 2 sts, ch 3, rep from * around. This should produce 6 loops. Sl st to ch 2 at beginning of rnd.
Rnd 3 - Sc in first ch 2, dc space. 3 sc over ch 3. Picot stitch (Ch 5, sl st in base of ch 5, ch 6, sl st in base of ch 6, ch 5, sl st in base of ch 5. Sl st in base of first ch 5. 3 sc in other side of ch 3.) Sc in space between next 2 dc. Repeat around. Sl st to 1st sc, and fasten off, leaving a long tail for sewing. Weave in center end.

Braided/Woven Six or Eight Strand Infinity Scarf

I saw patterns for similar scarves on Pinterest, and I customized it some to suit my taste.

I used a chunky yarn (some kind of Wool-Ease yarn from JoAnn Fabrics).


You will start with a chainless foundation - actually, just make one row for each of the 8 strands (I suppose you could make the rows wider if you wanted to make a wider scarf, but I haven't tried it.) Read about how to make a chainless foundation here. You will want to do the chainless DC stitch for approximately 150 stitches (longer or shorter to suit your tastes for an infinity scarf. It will end up longer than you think!) If you want a normal scarf, you will probably want to make it longer.


I did careful step by step photos, but unfortunately, only for the first time I braided it - which didn't end up lying flat enough, so I redid it. 

After you make 6 strands, single crochet across the ends to attach them - so it looks like this:


Make sure you crochet the BEGINNING ends together, or they will be a pain to unravel later when you need to match the ends up! Don't ask me how I know - haha!

You can then start braiding the scarf - don't pull too tight, or the braid will bunch up instead of lying flat. I have two diagrams: one for a six strand braid and one I accidentally drew first, for an eight strand braid.


Basically, work from the left: under, over, under - then from the right: over, under, like you are weaving.


The eight strand braid is similar. Work under, over, under, over, from the left, then over, under, over, from the right, in the same cross-weaving pattern.

When you get to the end, all of the ends will not be the same length. You can unravel them until they are even. This is why you wanted to start braiding at the beginning of the strips instead of the end!


When you are finished matching them up, they should look like this. Single crochet across the ends like you did at the beginning of the scarf (you just might want to pin them so they don't unravel while you are attaching them).


After this, you hold both ends of the scarf together - make sure it isn't twisted - and single crochet or slip stitch the ends together to make the scarf an infinity scarf, or leave it as is if you just want a normal scarf.


Good luck! If you are confused, I'm happy to help.

For the hat tutorial, click here.

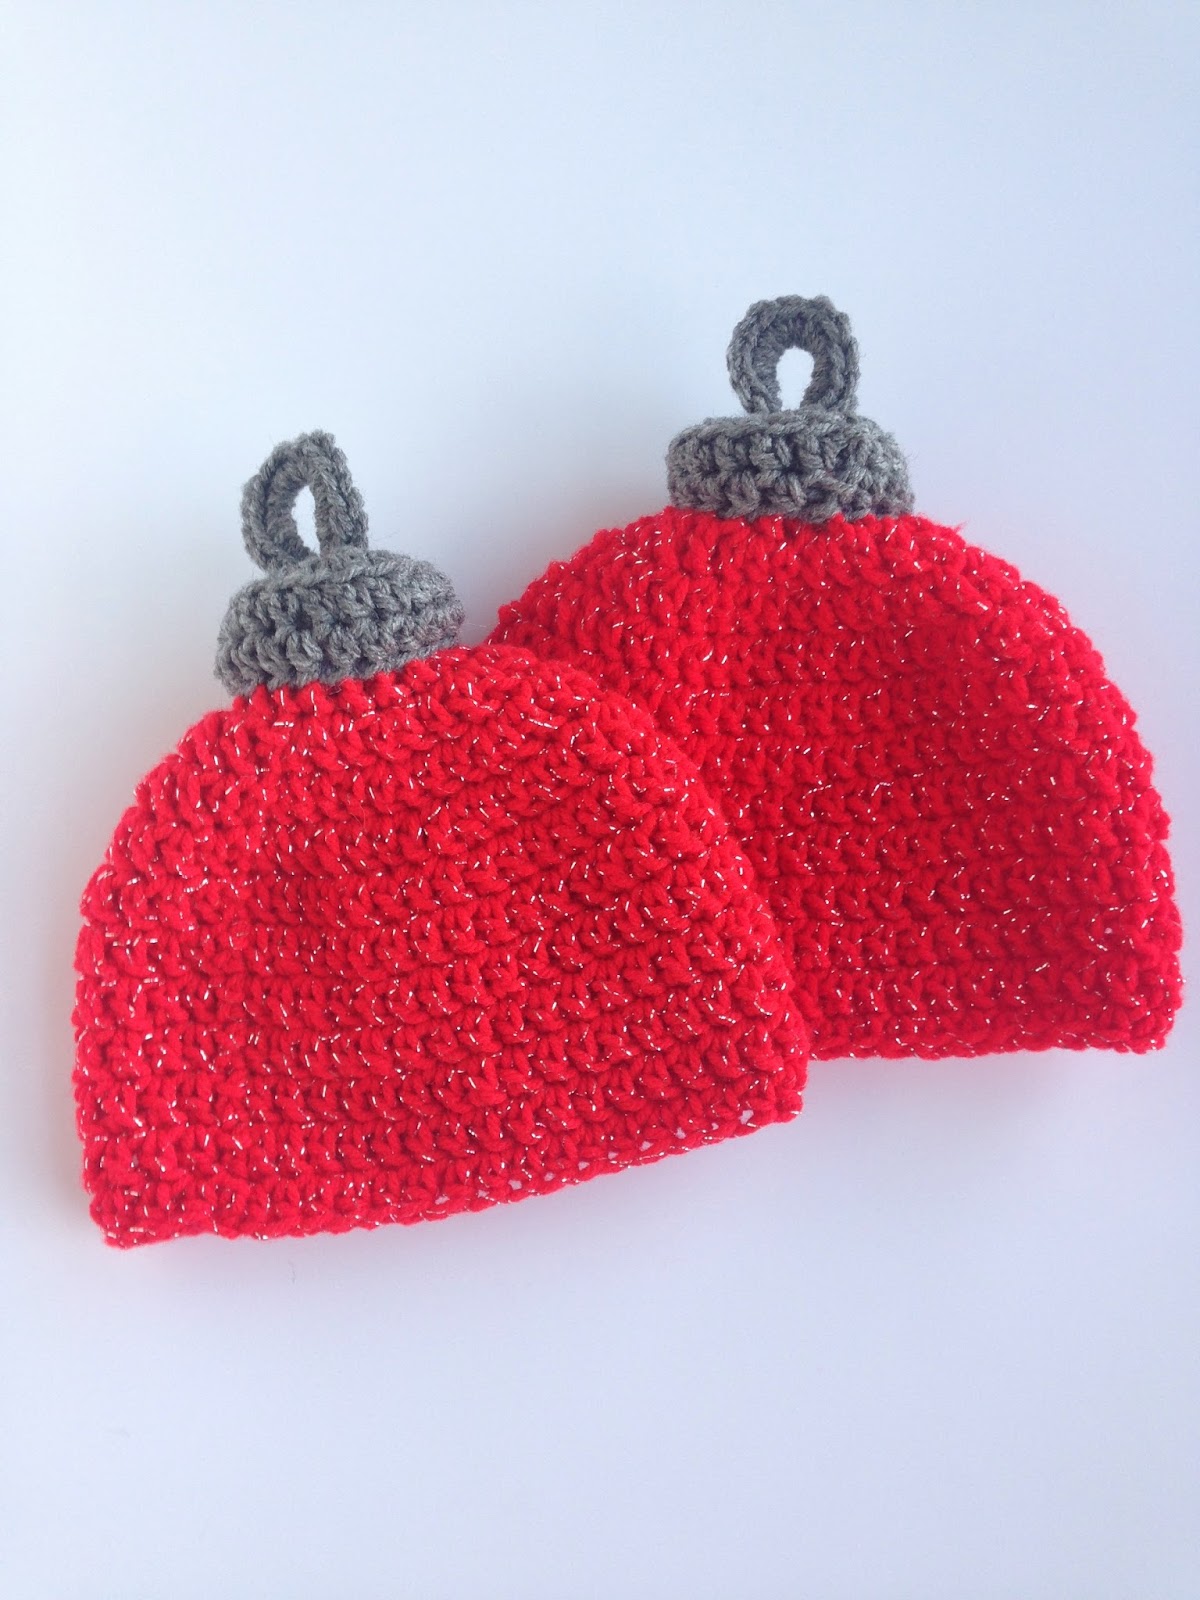
Crochet Christmas Ornament Baby Hat

I have patterns for this hat in two sizes - 0-3 months and 3-6 months, The yarn I made it with is probably a bit scratchy but I thought maybe the hats could just be used for photo shoots, or the baby could wear one of those thin little jersey knit hats underneath. I had the sparkly Christmas yarn and I wanted to use it up!


Abbreviations

Ch - chain
St - stitch
Sc - single crochet
Dc - double crochet
Hdc - half double crochet
Sl st - slip stitch
BL - back loops
Rnd - round
Rep - repeat

0-3 months

Hat base

Rnd 1 - Create magic ring, ch 2, dc 9 in magic ring, sl st to close. (9) Here is a good magic ring tutorial.
Rnd 2 - Ch 2, 2 dc in each dc, (18) sl st
Rnd 3 - Ch 2, *2 dc in first dc, dc in next dc, rep from * around, (27) sl st
Rnd 4 - Ch 2, *2 dc in first dc, dc in next 2, rep from * around, (36) sl st
Rnd 5 - Ch 2, *2 dc in first dc, dc in next 5, rep from * around, (42) sl st
Rnds 6-12 - Ch 2, dc around, (42) sl st
Rnd 13 - Ch 1, hdc around, (42) sl st.

Ornament topper

Rnd 1 - Create magic ring, ch 2, dc 9 in magic ring, sl st to close
Rnd 2 - Ch 1, 2 hdc in each dc, (18) sl st
Rnd 3 - Ch 1, hdc in bl around,(18) sl st
Rnd 4 - Ch 1, hdc around, (18) sl st

Loop for ornament topper

Hook onto center of ornament topper and begin a chain (6 st). Attach end of chain to center of topper as well. Now, begin to sc over the chain until you have a nice, tight row of sc stitches forming the loop, as shown in the picture.


Sew the topper onto the top of hat, stuffing as you go.

3-6 months

Rnds 1-4 - Use rounds from 0-3 month pattern. (36)
Rnd 5 - Ch 2, *2 dc in first dc, dc in next 4, rep from * around until one stitch is left, 2 dc in that stitch, (44) sl st to close
Rnds 6-12 - Ch 2, dc around, (44) sl st
Rnd 13 - Ch 1, sc around, (44) sl st

Ornament topper

Rnd 1 - Create magic ring, ch 2, dc 9 in magic ring, sl st to close
Rnd 2 - Ch 1, 2 dc in each dc, (18) sl st
Rnd 3 - Ch 1, hdc in bl around, (18) sl st
Rnd 4 - Ch 1, hdc around, (18) sl st

Loop for ornament topper

Same as 0-3 month loop, only chain 8 stitches instead of 6.

This snowflake would be really cute to sew onto the side!

Please let me know if you are confused by any of my patterns and need help! I am still new to writing them down.

Monster Toes Booties Crochet Tutorial

I made these Monster Toes booties for a friend's sweet new baby! I don't have the entire pattern in this post, but hopefully I can walk you through it.


Start with a basic bootie pattern, one that comes all the way to the ankle in front. I like to use this pattern, making sure to work in a spiral and not join my rounds, otherwise I end up with a weird line across the bootie! I modified it a little, working the increases in round 2 evenly (2 hdc in each hdc all the way around), and I skipped the instructions after round 7 and before the rows, and just worked back and forth in rows.

When working back and forth in rows I worked my stitches in these side loops to avoid ridges.


After finishing row 14 and joining, I created a ribbed cuff as follows:

Hdc - half double crochet
FPDC - front post double crochet
BPDC - back post double crochet
Sl st - slip stitch
Sc - single crochet
Rnd - round

Round 1 - Attach at heel, chain 1, pick up 18 hdc around, join with slip stitch to close.
Rounds 2-3 - Ch 1, fpdc, bpdc around to close.

After this, I made four monster toes per bootie and sewed them on.

Toe: 

Rnd 1 - Ch 1, 3 sc in magic ring, sl st to close (3)
Rnd 2 - Ch 1, 2 sc in each sc, sl st (6 st)
Rnd 3 - Ch 1, sc around, sl st (6)

And there you have it! I made them to match this hat:


You can find the pattern for the hat here.

I hope to have them up for sale on my Etsy shop soon!

Crochet Knight Helmet (Adult size)

Hey everyone! Here is the pattern for a crochet knight helmet - the size is tween/adult small. It would be easy to make it a bit bigger - just throw in a few extra stitches when you make the hat base, then move the visor around to fit when you sew it on.


Abbreviations
Ch - chain
Sc - single crochet
Dc - double crochet
Dc2tog - double crochet two together (decrease)
St - stitch
Sl st - slip stitch
Rep - repeat
Rnd - round

Hook size: H (5mm)

Hat Base

Rnd 1 - Make magic ring, ch 2, 9 dc around, sl st to close (Here is a good tutorial on how to do a magic ring.)
Rnd 2 - Ch 2, *2 dc in each dc, rep from * around, sl st
Rnd 3 - Ch 2, *2 dc in first dc, dc in next, rep from * around, sl st
Rnd 4 - Ch 2, *2 dc in first dc, dc in next two dc, rep from * around, sl st
Rnd 5 - Ch 2, *2 dc in first dc, dc in next three dc, rep from * around, sl st
Rnd 6 - Ch 2, *2 dc in first dc, dc in next four dc, rep from * around, sl st
Rnd 7 - Ch 2, dc around, sl st
Rnd 8 - Ch 2, *2 dc in first dc, dc in next eight dc, rep from * around, sl st
Rnd 9 - Ch 2, dc around, sl st
Rnd 10 - Ch 2, *2 dc in first dc, dc approximately 1/3 of the way around, rep from * around, sl st (Basically you should have three increases from this round, evenly spaced.)
Rnds 11-15 - Ch 2, dc around, sl st
Rnds 16-19 - Ch 2, dc halfway around, turn (You will be working back and forth to create the flap at the back of the hat.)

Visor

Rnd 1 - Make magic ring, ch 2, 9 dc around, sl st
Rnd 2 - Ch 1, *2 sc in first dc, rep from * around, sl st

Now you will be working in rows and switching between gray (G) and black (B). You will have a lot of ends to weave in later! Start your rows by working across the top of the circle in gray. Turn your work at the end of each row.

Row 1 - (G) Ch 2, 3 dc
Row 2 - (B) Ch 2, 2 dc in first st, dc in next, 2 dc in last
Row 3 - (G) Ch 2, 2 dc in first st, dc in next 3, 2 dc in last
Row 4 - (B) Ch 2, 2 dc in first st, dc in next 5, 2 dc in last
Rows 5-9 - (G,B,G,B,G) Ch 2, dc across
Row 10 - (B) Ch 2, 2 dc in first st, dc in next 7, 2 dc in last
Rows 11-12 - (G,B) Ch 2, dc across
Row 13 - (G) Ch 2, 2 dc in first st, dc in next 9, 2 dc in last
Row 14 - (B) Ch 2, dc2tog, dc in next 9, dc2tog
Rows 15-16 - (G,B) Ch 2, dc across
Row 17 - (G) Ch 2, dc2tog, dc in next 7, dc2tog
Rows 18-22 (B,G,B,G,B) Ch 2, dc across
Row 23 - (G) Ch 2, dc2tog, dc in next 5, dc2tog
Row 24 - (B) Ch 2, dc2tog, dc in next 3, dc2tog
Row 25 - (G) Ch 2, dc2tog, dc in next, dc2tog, finish off.

Now you will need to make a matching circle for the other side of the visor. Repeat rounds 1 and 2 from the beginning of the visor.

 Use sc to attach the circle to the rest of the visor, .like in this picture:


Continue on with sc around. 3 sc in middle row to make a point , then continue on as normal.


When you reach the circle on the other side, 2sc, sc in next 2 around, until you reach the other side of the visor, sc across (3 sc in middle row as on other side). When you reach the first circle, 2sc, sc in next 2 around, sl st to close, use tail of yarn to sew up small gap where circle is attached.


Crest

You will need to make 2 pieces.

Row 1 - Ch 27, dc in 3rd ch from hook, dc across (25 sts total)
Row 2 - Ch 2, dc across

Take both pieces and hold them together. Sc around 3 sides to attach (short side, long side, short side).

Assembling the hat

Sew the crest to the back of the hat as shown in the photo.

Try the hat on and carefully pin the visor to fit, then sew the circles on (use a few stitches in the center so they will still pivot) and sew silver buttons in the center of the circles.

You may want to add a bit of velcro to the visor edge and hat edge so the visor won't fall down around your neck. The best place to sew this on is in the corner by the flap that goes across the back of your neck, but play around with it to find a good place to sew it on where it doesn't show.

Enjoy!

If you have any difficulties, please let me know and I will try to help. My patterns aren't always perfect!

Crochet Pompom Hat


This crochet hat can be adapted to fit any size, if you can try it on the person while you are making it. I made it in newborn size so I will give the directions for that.

Abbreviations
Ch - chain
Rnd - round
Dc - double crochet
Sc - single crochet
St - stitch
Sl st - slip stitch
Fpdc - front post double crochet
Bpdc - back post double crochet

Hook size: H (5mm)

Here is a tutorial I found on Youtube:


Rnd 1 - Start with a chainless foundation. You can read about how to make a chainless foundation in this tutorial. It makes the base nice and stretchy, which will be necessary as you are working this hat from the bottom up. Ch 3, then make a chainless foundation of 38 dc stitches. Join first st to last st to create a round.
Rnd 2 - Ch 2, fpdc, bpdc all the way around, sl st to first st. (This creates a ribbed stitching like you would traditionally see on the bottom of a hat or cuff of a sweater.)
Rnds 3-11 - Ch 2, dc around, sl st to close.

Finishing off the top of the hat - Flip the hat inside out, then sc both sides together to close. Alternatively, you could just sew it together. Finish off. 

Create pompoms and sew them to the corners. Here is a good tutorial on how to make large pompoms. You're done!


To adjust this for bigger sizes, a.) crochet the chainless foundation until it stretches around the hat-wearer's head and b.) add double crochet rows until the hat is long enough.